

How to Set Up Your Core Klaviyo Flows
(Step-by-Step Guide for 2026)

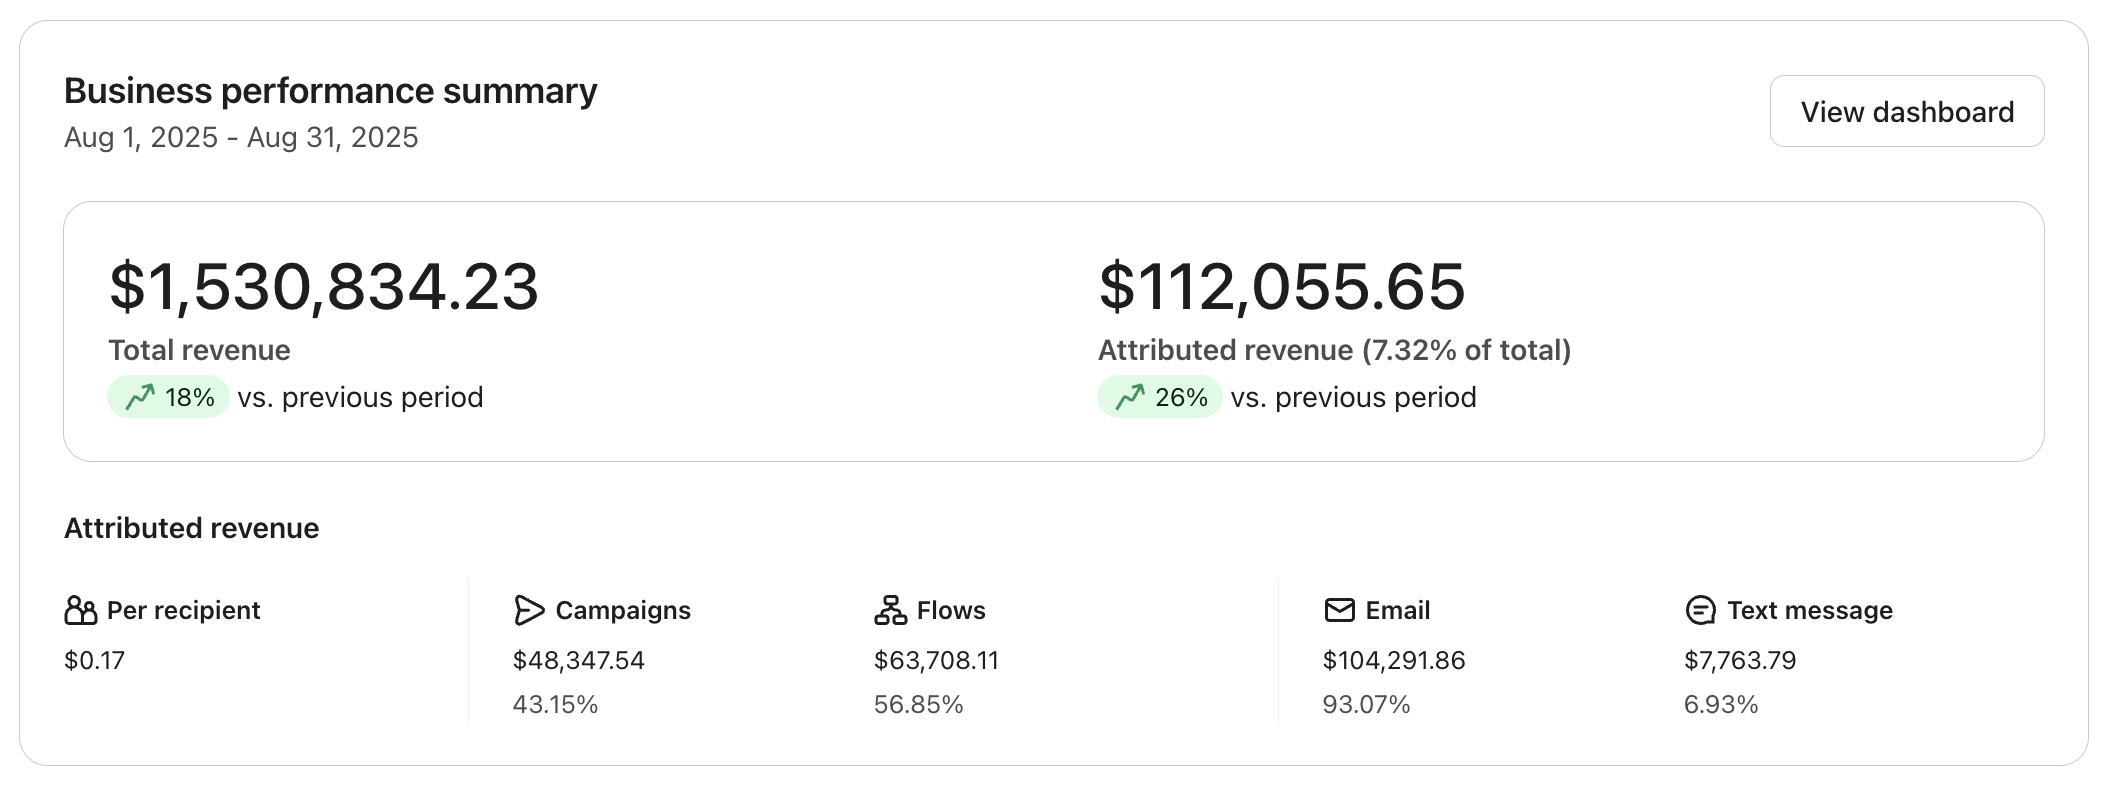
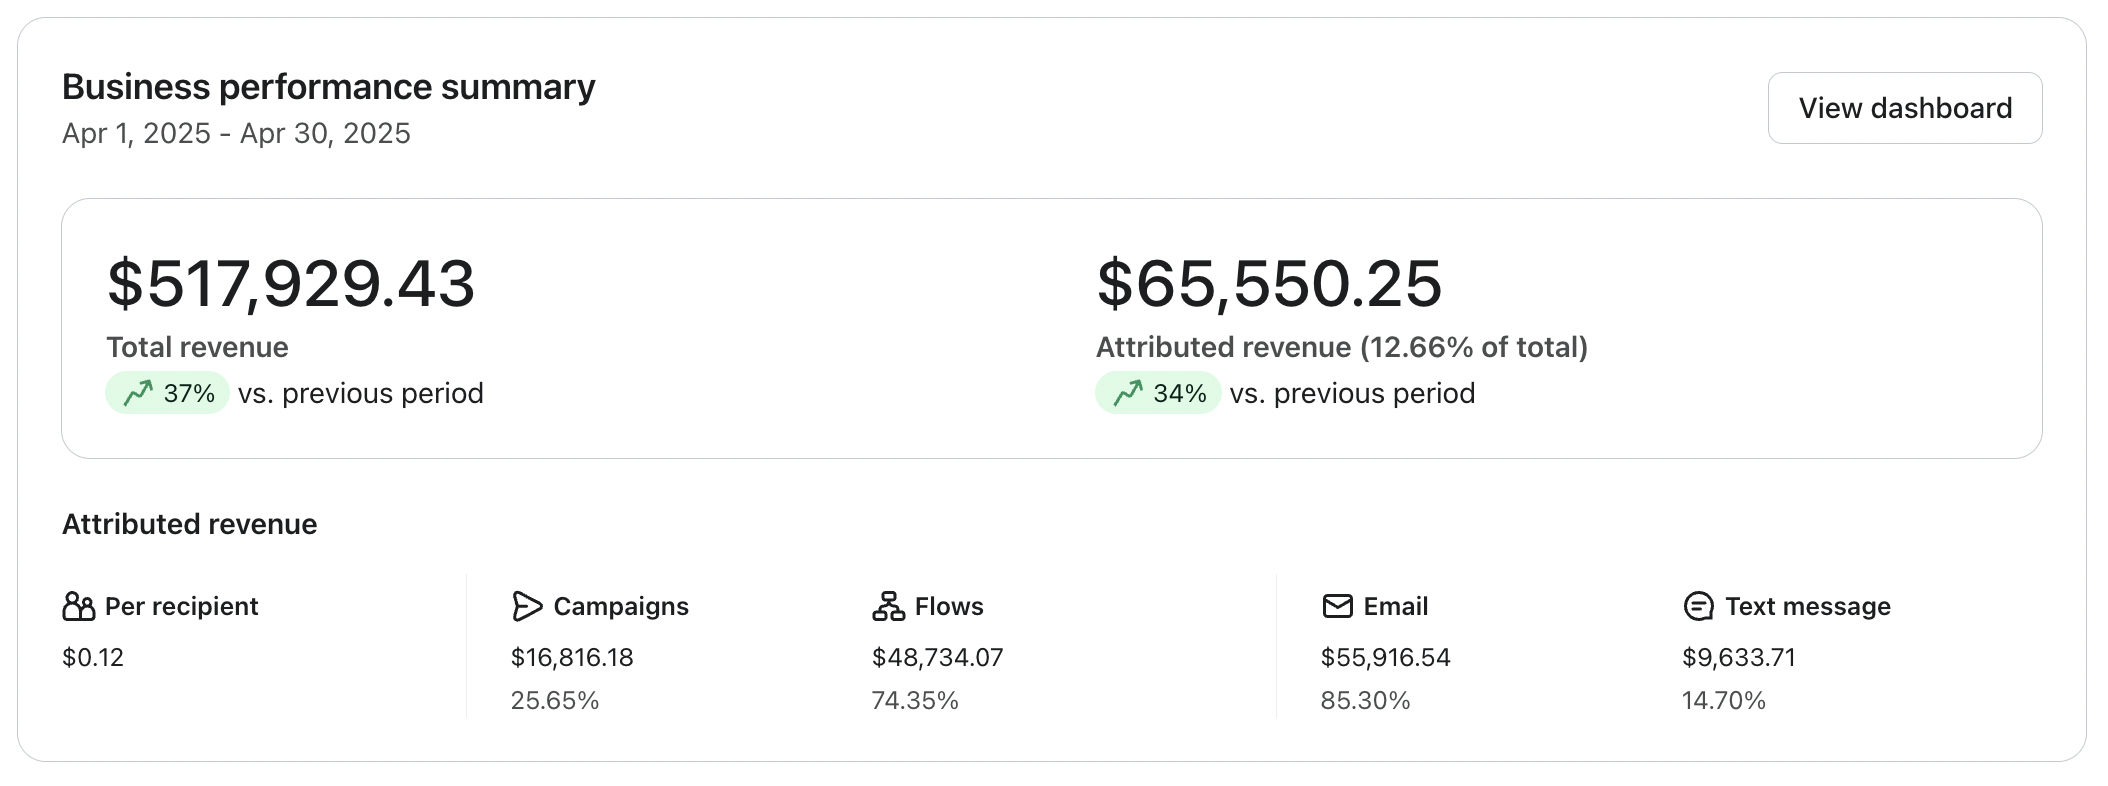
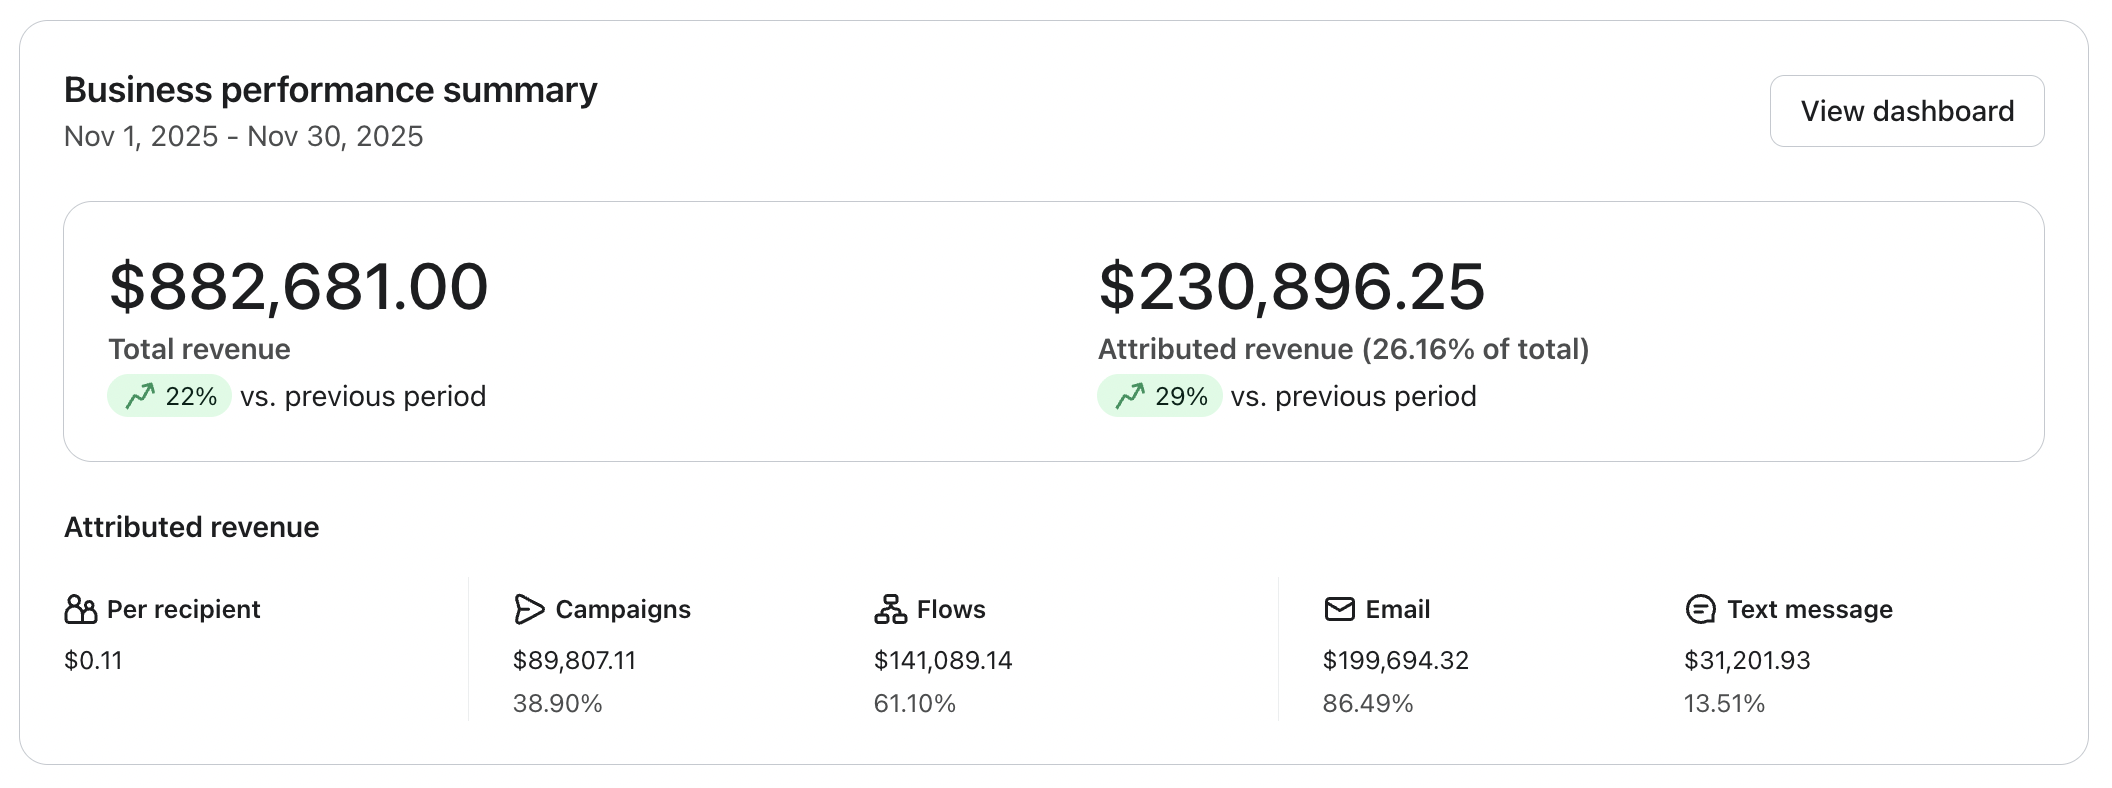
The proof is in the pudding
Who is this for
- eCommerce founders doing $50k+/month who know there’s more revenue sitting in their email
- You’ve got Klaviyo set up, but it’s not performing the way it should
- You’re relying heavily on campaigns and discounts to drive sales
- You want email to become a consistent, automated revenue channel
- You sell a product customers genuinely love and come back for
- You’re tired of guessing what flows to build or what to send next
- You want to add flows to drive 20–30% of your revenue
- You want to reduce manual work and have systems running in the background
- You’re ready to create personalized customer journeys at scale
- You want a clear, step-by-step way to set everything up (without tech headaches)
- You value proven frameworks, real examples, and practical execution over theory
This training will cover
- Technical knowledge of how Klaviyo's flow builder works.
- How to set yourself up for Klaviyo flow success.
- The 9 core emails flows that every brand needs.
- The exact emails to include in every single flow with breakdowns.
- Visual examples of what these email should look like.
- Where and WHY to feature plain text emails within email flows.
Let's get some technical stuff out the way…
What is a flow trigger?

A flow trigger in Klaviyo is an event or condition that automatically initiates a series of pre-defined actions called a "flow."
It serves as the starting point for an email flow. The trigger activates the flow, setting the automated actions in motion.
What is a Trigger Filter?

A Trigger filter in Klaviyo is a condition that determines whether or not a person should enter a flow, even after the trigger has been activated.
It acts as a gatekeeper, allowing you to further specify which customers should receive the automated messages in your flow.
For example, if you have a "Checkout Started" trigger, you might add a flow trigger that only allows customers with cart values over $100 to enter the flow.
This way, you can tailor your communication strategy based on specific customer characteristics or behaviours.
What is a Profile Filter?

A profile filter in Klaviyo is a condition that determines whether a person should receive a specific email or SMS message within a flow, based on their profile properties.
Profile filters allow you to create more targeted and personalised content for each recipient.
For example, you might use a profile filter to send different messages to customers based on their location, gender, or previous purchase history, ensuring that each customer receives content that is most relevant to them.
What is a flow Time Delay?

A time delay in Klaviyo is a setting that pauses a flow for a specified period before the next action occurs.
It allows you to control the timing of your automated messages and space them out according to your desired schedule. Time delays are crucial for creating a well-paced and effective communication strategy.
What is a Trigger Split?
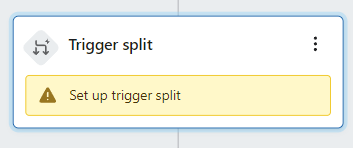
A trigger split in Klaviyo allows you to create multiple paths within a flow based on different trigger events.
It splits the flow into separate branches, each with its own set of actions and messages.
What is a Conditional Split?

A conditional split, on the other hand, creates multiple paths within a flow based on specific conditions or criteria.
It allows you to further segment your audience and personalise your messages based on customer data.
For instance, you could use a conditional split to send different messages to customers based on their total spend, loyalty program status, or engagement level.
Before we jump into the flows themselves…
I want to make one point very clear.
Success with email marketing is 100% dependant on the quality of your product.
Do you have lot's of positive reviews?
Is this something people genuinely want to buy?
After all, email marketing is a retention strategy meaning we're trying to convert new eyeballs and sell more to existing customers.
Advanced flows, campaigns and Klaviyo setup won't make up for the lack of a good offer and product that people genuinely want to buy.
This will only work for those who have found product market fit and are in a position to scale and take their brand to the next level.
7 Core Email Flows…
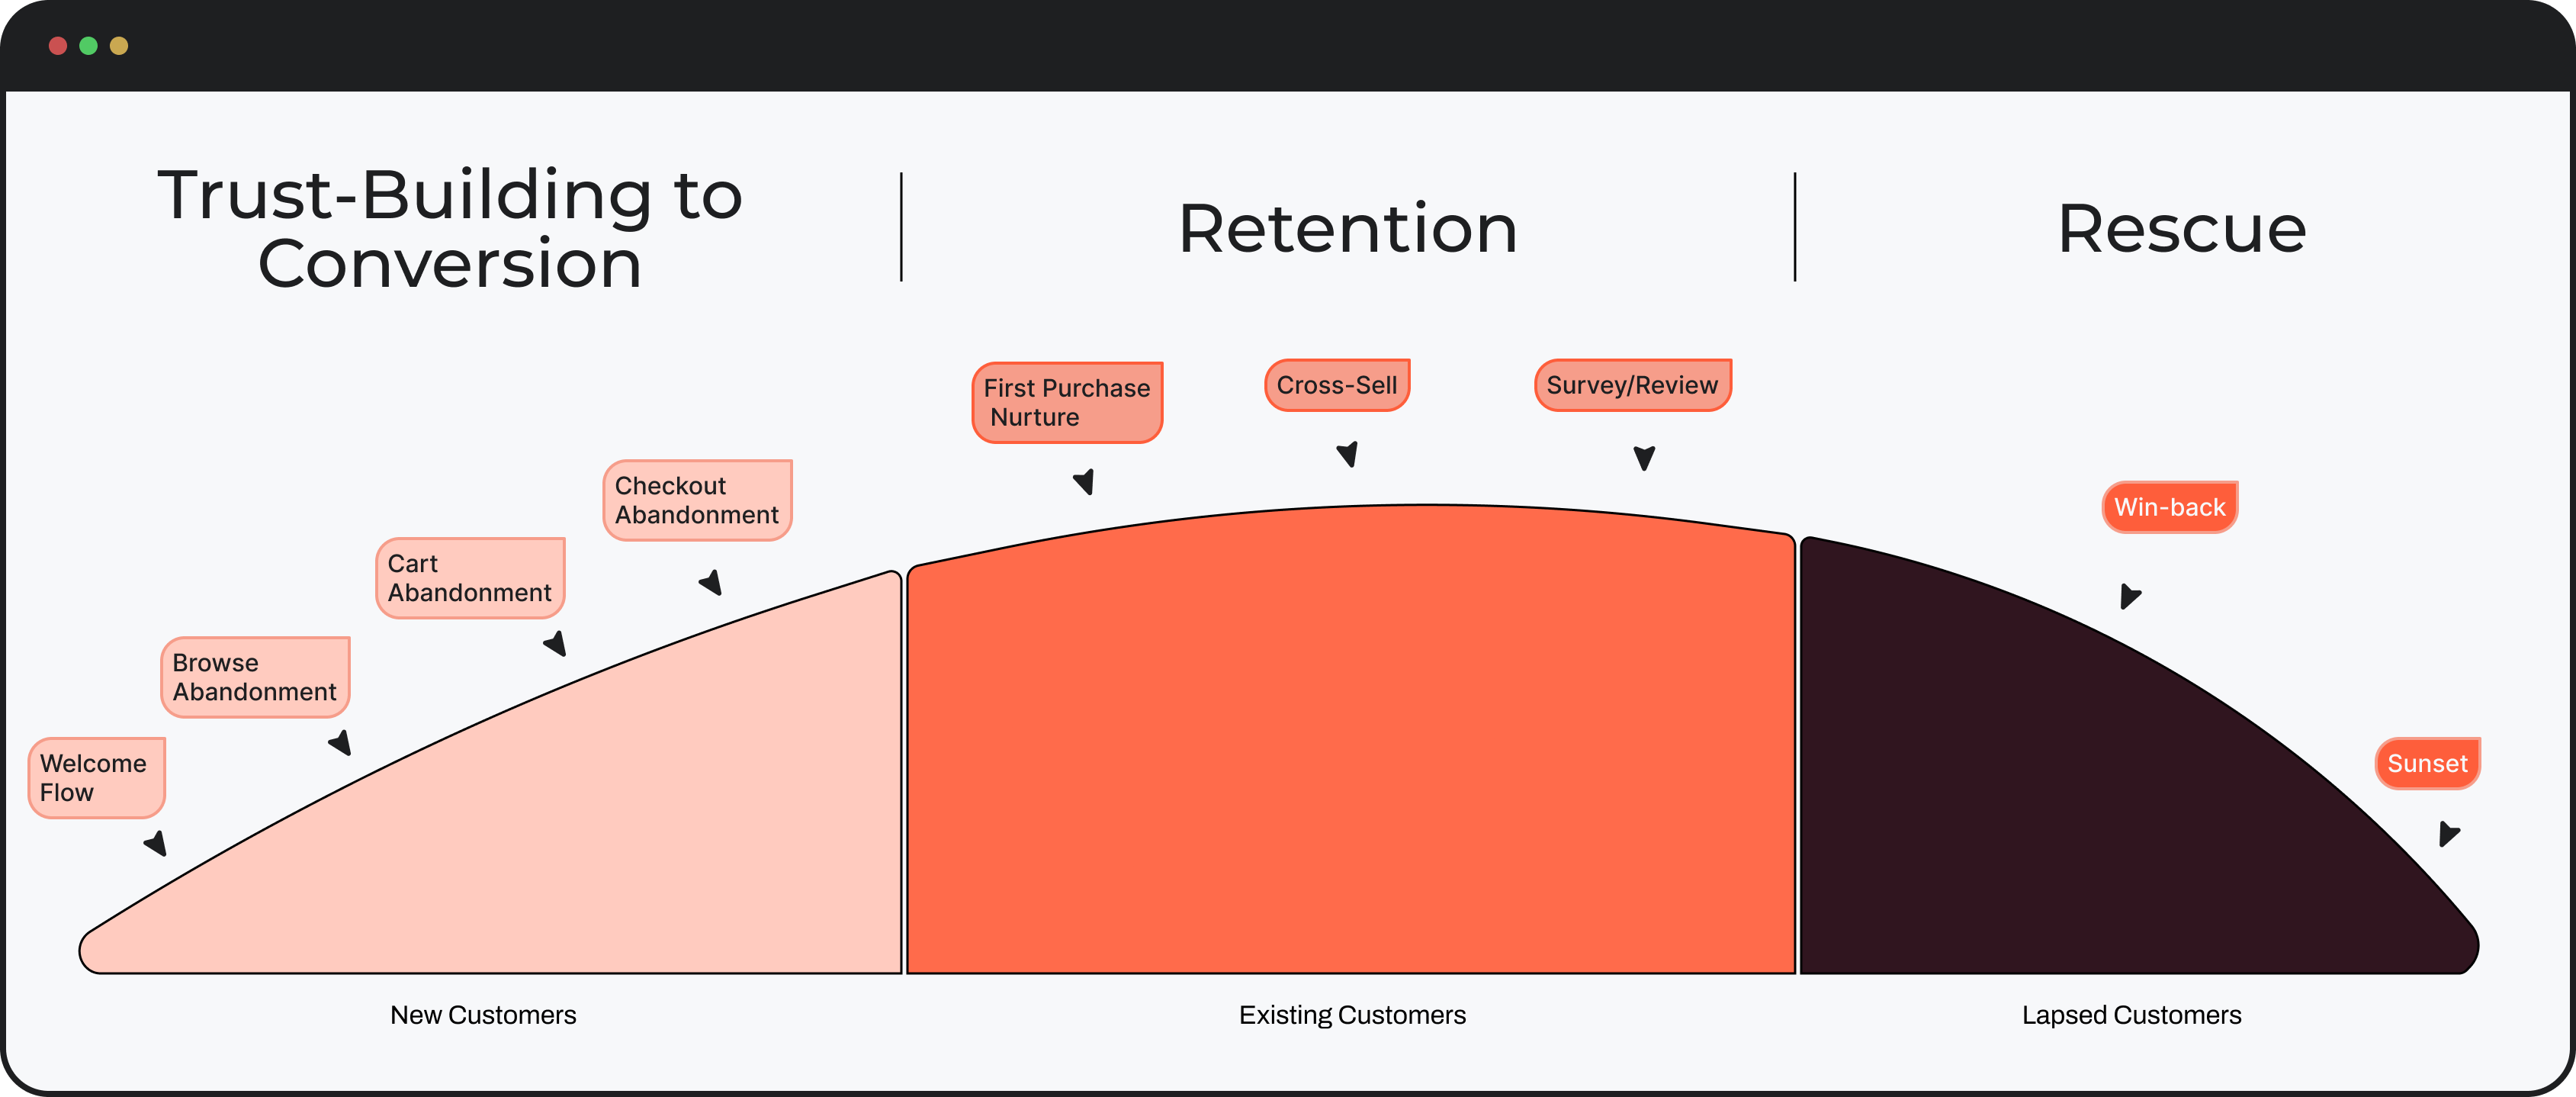
1. Welcome Series Flow
What is the Welcome Series flow?
The Welcome Series is the first point of contact a new subscriber has with your brand via email.
It's like the digital equivalent of someone walking into a store front and being greeted by drop dead gorgeous, pleasant, well spoken sales rep.
Usually, the Welcome Series features a discount or a special offer that they opted in to receive.
Your Welcome Series is where you want to educate and nurture the customer by sending them a sequence of emails with goal of helping them make a buying decision.
They just opted into our list, the is the perfect time to educate the customer. Note, this flow is for new site visitors who have NOT yet placed an order.
This is the sequence of emails that the profile receives immediately after opting into your popup.
Trigger
- Added to your main list within Klaviyo/The list you popup is connected to.

Trigger Filters
- Placed order 0 times since starting this flow
This ensures that anyone who places an order will be removed from the flow

PRO TIP:
Bounced Email= 0 since starting flow
Marked email as spam = 0 since starting flow
Clicked email to unsubscribe since starting this flow
That last one matters a lot. These are high-intent emails. You usually do not want Klaviyo suppressing them because the subscriber got another email recently.
Re-entry: usually off
Turn off Smart Sending on these emails so subscribers don’t get skipped
Welcome Email #1:
Code delivery, brand intro and best sellers
Section 1 – Above the Fold:
Introduce the brand with a strong headline, product-focused image, and 1–2 lines of supporting text. Include a clear CTA and mention the offer. This is the most important real estate, make it instantly actionable.
Section 2 – Offer Explanation:
Clearly explain how to claim the discount. Show the code and tell them exactly how to use it at checkout.
Section 3 – Brand Intro:
Briefly explain what the brand is, who it’s for, and why it exists. Keep it to 1–2 sentences.
Section 4 – Differentiation:
Highlight what makes the product different or better than alternatives.
Section 5 – Objection Handling:
Address one key concern (quality, ingredients, results, etc.) in a simple, reassuring way.
Section 6 – Trust Builder:
Add light credibility (reviews, experts, or product quality).
Section 7 – Best Sellers:
Showcase 2–4 top products with a CTA to shop.
Section 8 – Risk Reversal:
Include a guarantee or reassurance to reduce hesitation.
Section 9 – Final CTA:
End with a clear prompt to shop or claim the offer.
Example:

Welcome Email #2:
Comparison, differentiation, and objection handling
Section 1 – Hook:
Start with a curiosity-driven or relatable question that highlights the problem with the “old way” of doing things.
Section 2 – Us vs Them:
Visually or conceptually compare your product to traditional alternatives. Make the contrast obvious and easy to understand.
Section 3 – Key Metric:
Highlight one clear, powerful difference (e.g. carbs, price, time saved). Keep it simple and memorable.
Section 4 – Early CTA:
Include a call to action shortly after the comparison to capture ready buyers.
Section 5 – Explanation:
Briefly explain why your product is better. Focus on what was changed or improved and the benefit to the customer.
Section 6 – Deeper Proof:
Reinforce the comparison with additional points (features, ingredients, results, etc.).
Section 7 – Soft CTA:
Use a light, conversational push to encourage action.
Section 8 – Risk Reversal:
Add a guarantee or reassurance to remove hesitation.
Example:

Welcome Email #3:
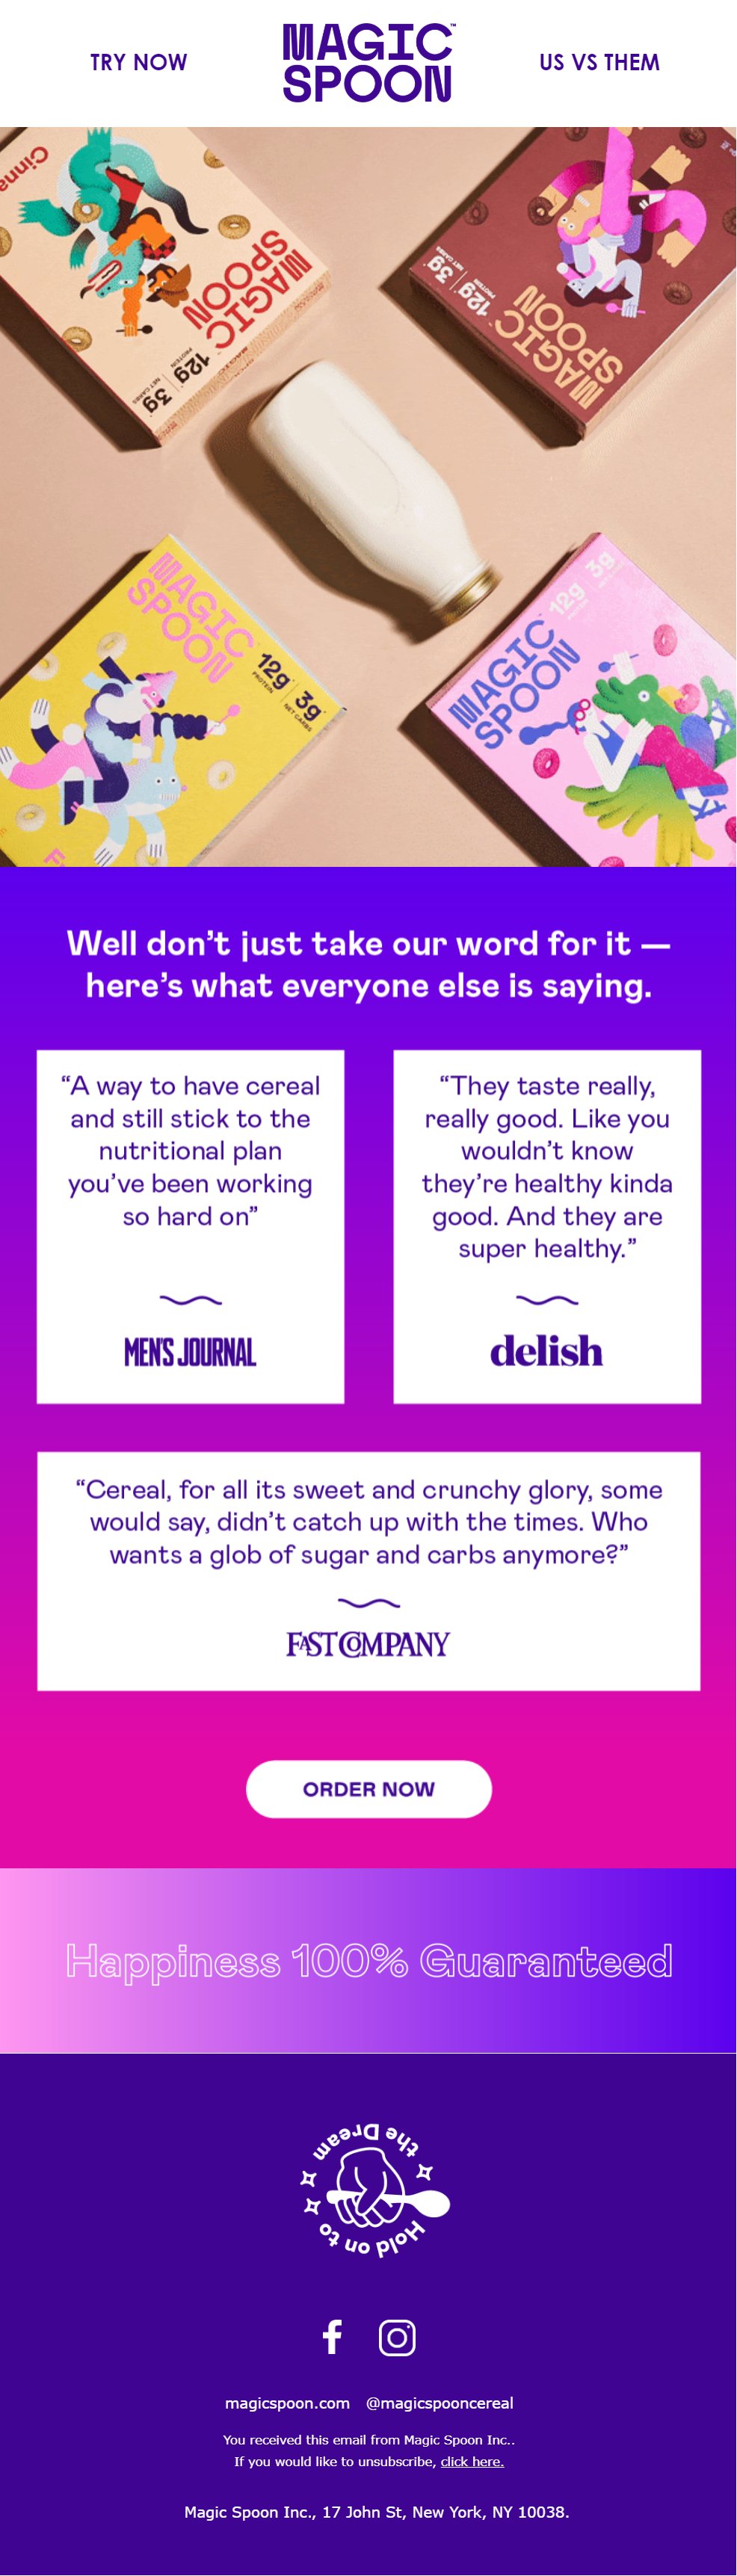
Social proof, validation, and trust building
Section 1 – Visual / Reset:
Start with a clean product-focused visual or layout to re-engage attention.
Section 2 – Social Proof Header:
Introduce the section with a line that shifts from brand claims to external validation (e.g. “Don’t just take our word for it…”).
Section 3 – Authority Proof:
Include 2–4 strong testimonials from credible sources (press, influencers, or customers). Keep them short and benefit-driven.
Section 4 – Reinforced Benefits:
Ensure each testimonial highlights a key benefit (taste, results, quality, etc.).
Section 5 – CTA:
Place a clear call to action after the proof to capture increased trust.
Section 6 – Risk Reversal:
Reinforce a guarantee or reassurance to remove hesitation.
Example:
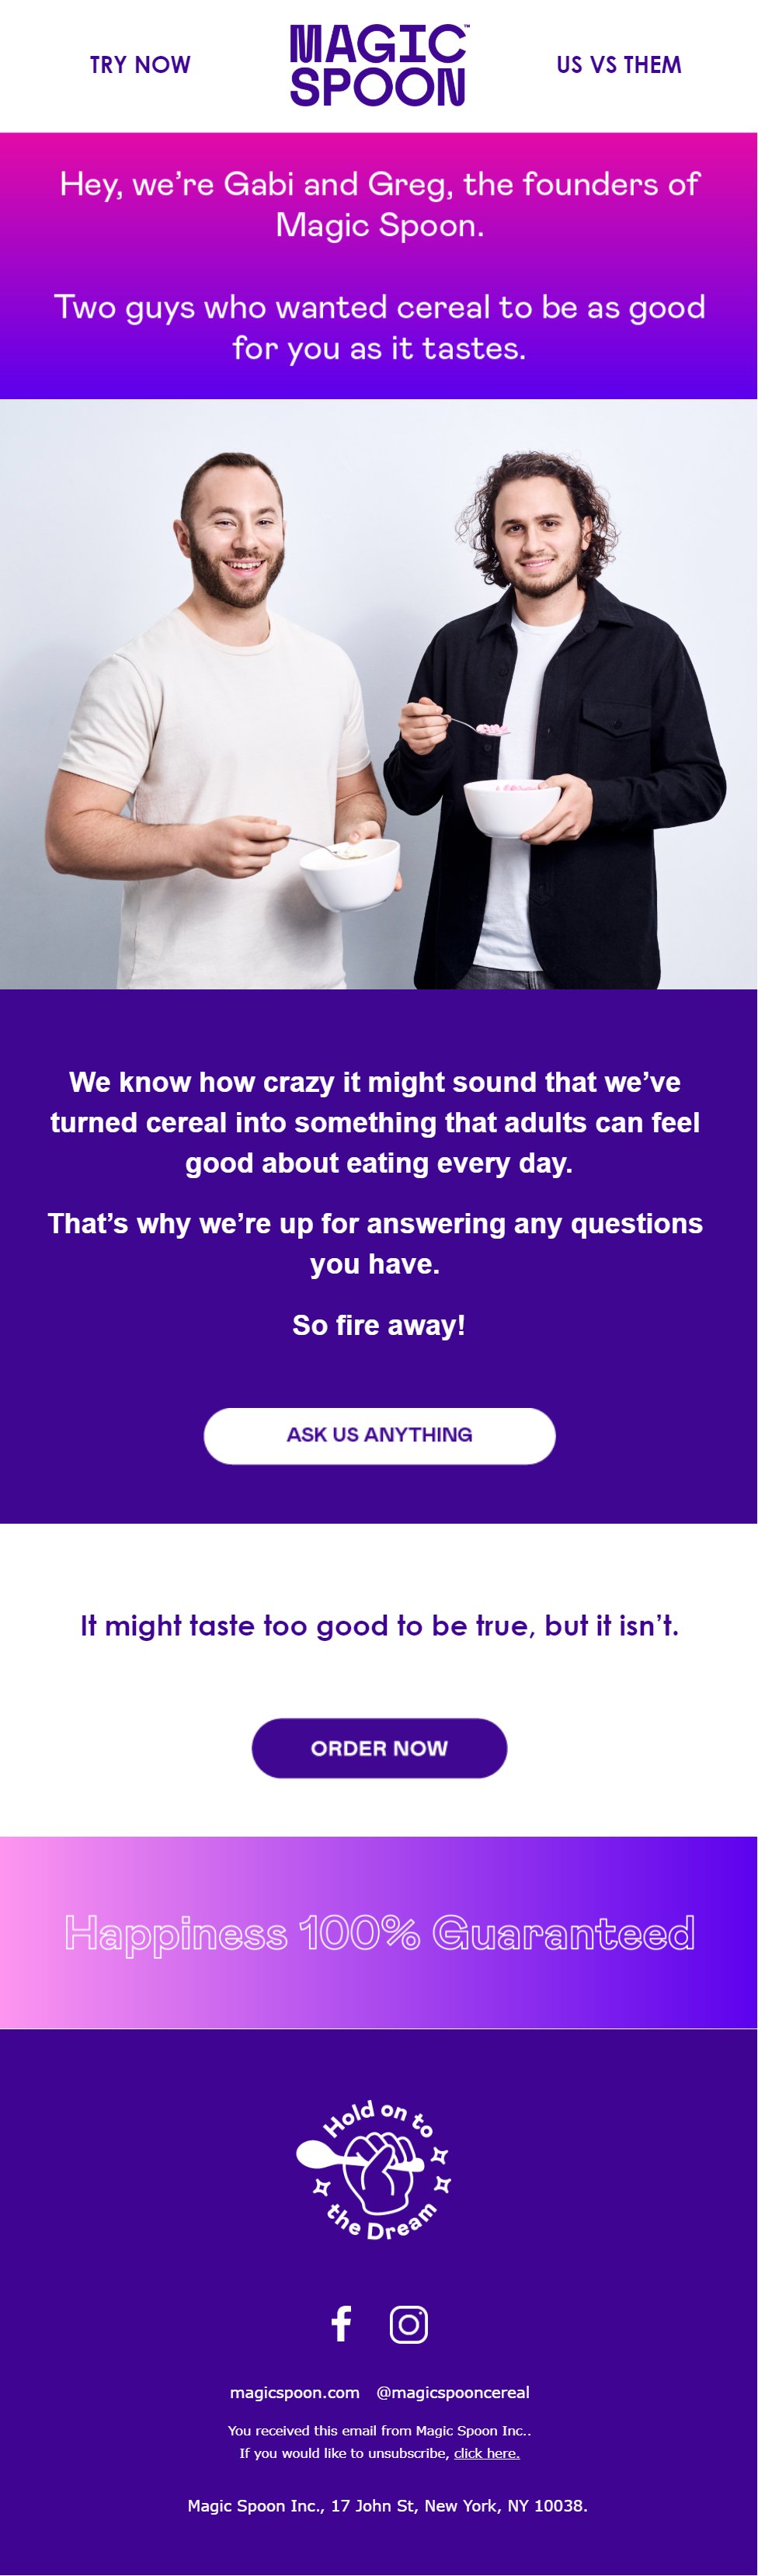
Welcome Email #4:
Founder story, humanization, and trust building
Section 1 – Founder Intro:
Introduce the founders in a casual, human way. Use names and keep it conversational.
Section 2 – Origin Story:
Briefly explain why the brand was created. Focus on the problem and desired outcome in 1–2 sentences.
Section 3 – Human Visual:
Include an image of the founders or real people behind the brand to build trust.
Section 4 – Acknowledge Skepticism:
Address any doubt or disbelief in a relatable way to disarm hesitation.
Section 5 – Engagement دعوت:
Invite the reader to ask questions or reply. Make the brand feel accessible.
Section 6 – Reinforcement:
Add a short line reinforcing the product’s value or promise.
Section 7 – CTA:
Include a clear prompt to purchase.
Section 8 – Risk Reversal:
Reinforce guarantee or reassurance to remove hesitation.
Examples:
Want my AI prompts to write your welcome emails in seconds? 👇
[Pop-up embed form]